Installing Microsoft Office SharePoint Server 2007
1. Login to the computer with Domain Admin Account
2. Install Microsoft Windows Server 2003 Enterprise or Standard
3. Install Windows Server 2003 Service pack 1 or 2
4. Install IIS 6.0 with ASP.NET Enabled

5. Install Microsoft SQL Server 2000 with Service pack 4 or SQL Server 2005 with Service Pack 1 or 2.
6. Add Current Windows Users as SQL Server Administrator
a. Open SQL Server Management Studio
b. Connect to the server
c. Expand the server node
d. Expand the Security Node
e. Right Click on the Logins and Click Create New Login

f. Enter The Service account and Click Search

g. Enter the Service account again and click Check Names and click OK When confirmed.

h. Click on Server Roles from the left menu
i. Check Permissions for
i. DB Creator
ii. SysAdmin
iii. Security Admin
iv. Server Admin

7. Click OK
8. This User will be visible in the Logins window.

9. Now Confirm that the current logged in user is par to Administrator group on the server

10. Install .NET Framework 3.0
a. Go to E:\Library\Softwares\Microsoft\Dotnet Framework\DotNet Framework 3.0
b. Run dotnetfx3.exe to install the framework

11. Go to K:\MSP EPM\EPM Initiative\5 - Deployment\Upgrade Software\SharePoint Server 2007
12. Run Setup.exe
13. Enter pRoduct key from key.txt file
14. Click Continue
15. Check I Agree to license agreement and click Contineue

16. Click Advance to Choose the Advanced installation options

17. Click Complete to installed SharePoint Server 2007 as complete installation and click Install Now.

18. Wait while SharePoint setup install its binaries

19. Click Close and let the SharePoint Configuration Wizard Check box as Enabled.

20. Click Next on the SharePoint Products and Technology Configuration Wizard.

21. Click Yes on Services and IIS Reset dialog.

22. Click Create a New Server farm and click Next
23.

24. Enter Database Server Name
25. Enter the user with Administrative permissions on the SQL Server . The user name should be in the form of Domain\User Name

26. Check the specify port number checkbox and change the port number to some easy number. This will make you easily remember the Administrative site URL.
27. The default Security settings will be NTLM. If you want to go for Kerberos you can select the options. P.S. Kerberos authentication requires several complex steps for configuration. Should be done with appropriate knowledge of Networking Security.
28. Click Next

29. Click Next to confirm the changes you had made

30. Configuration Wizard will run the steps again
31. Click Finish when you see the screen.

32. SharePoint Central Administration Site will open automatically. You also need to add this site to Trusted Sites.
33. Enter Administrator user id and password in the login dialog window.
34. Click Add to Add this site to the trusted sites

35. Click Add and Close

36. You will see SharePoint Central Administration Web site

37. Enable Email Server on the environment
a. Click Operations -> Outgoing Email Settings
b. Enter Server name and Email Address and click OK

38. Enable Office SharePoint Server Search Service
Office SharePoint Server Search services is responsible for Crawling and indexing content stored Various MOSS Sites, File Shares, Network Shares, Lotus Notes Databases, SAP and People Soft (using Connectors). MOSS Search Service also provides Business Data Catalog that can extract data from any .NET Managed data source like SQL Server.
a. Click Operations -> Services on Server
b. Click on Start in front of Microsoft Office SharePoint Server Search
c. Under Query and Indexing section select both indexing and Query checkboxes
d. Enter Contact Email address
e. Enter Farm Search User Account which should be Domain user account. Do not use any build in account like network service etc.
f. Select path for the index file that will be created by the SharePoint Server 2007 Crawler.

g. Select from any of the Crawler performance options. This option will give appropriate memory and performance to SharePoint Server 2007 Crawler based on your system specifications.
h. If you have more than one search server you can choose different dedicated front end server but if you have single server installation you can leave the option as is.
i. Click Start when you are done.

39. Starting Microsoft Windows SharePoint Services Search Service
Windows SharePoint Services Search is responsible for Crawling and searching content that is stored in Windows SharePoint Services Sites.
a. Click Operations -> Services on Server
b. Click Start on the right side of Windows SharePoint Services Search

c. Enter Service Account for The Service (This account is required to run the service on the operating system
d. Enter Content Access Account is the account that has administrative access on all the sites on the server (This account is required to crawl content on the server)

e. Enter Database server and Database name for Windows SharePoint Services Search. WSS Stores index into SQL Server as compared to MOSS which stores content into an Index File (XML).
f. Select indexing schedule. A Good practice is to schedule after every 5 minutes to ensure efficient search. WSS search will not affect the performance of the server.
g. Click Start When you are done.
40. Starting Excel Services Service
a. Click Start on the right of Excel Services to start the service
41. Starting Document Conversion Launcher and Load Balancer Services
These two services provide the ability to SharePoint Server to Convert Microsoft Office Documents to WebPages if the client accesses these files does not have Microsoft Office Installed on the system. These services required additional settings which can be made by reading the Microsoft Office SharePoint Server deployment guide.
42. The services page will look like this

43. Creating a New Shared Service Provider for MOSS 2007 site
a. From left navigation click Shared Services Administration
b. New SSP

c. From the new SSP Page Enter SSP Title and then Click on Create a New Web Application for Administration Site host

d. Creating a New Web application for Shared Services Administration Site

i. Enter Port Number other than 80. E.g. (22 – which is easy to remember)
ii. Select NTLM for security

iii. Leave the reaming section unchanged
iv. In The application pool settings enter user name and password for the administrator (This user could be unique user other than current administrator)
v. Leave the rest of options unchanged

vi. Leave the rest of the options unchanged and click OK.
vii. After completion you will be back to NEW SSP Page.
viii. Click Start -> Run -> CMD
ix. Enter IISReset and press enter

x. Leave the section MySite Location as is.
xi. Enter the Administrator user id and password in the SSP Credential Section
xii. Change the Database names for both SSP DB and SSP Search DB to some relevant names.

xiii. Do not change the authentication method from Windows to SQL. Windows authentication is recommended.
xiv. Leave the remaining sections unchanged and click OK.

xv. Click OK on my site alert page.

xvi. When you receive confirmation that SSP Site is created.
xvii. Click Start -> Run -> CMD
xviii. Enter IIS Reset
xix. Click OK on the success page.

44. Creating Web Application for Portal Site
a. Click Application Management -> Create or Extend a New Web Application

b. Create a New Web application

c. Enter 80 as Port number
d. Leave Security and Load balance sections as is

e. In the Application pool section change the Application pool name (Optional)
f. Enter user id and password for administrator (this user could also be unique)
g. Leave the remaining sections as is and click OK

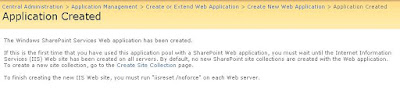
h. When you receive confirmation that web application is created
i. Click Start -> Run -> CMD
ii. Enter IISRESET and press enter

45. Creating a Site Collection or MOSS Portal
a. From Application Management -> Create a Site Collection
b. Select Default (80) web application from the web application drop down.
c. Enter Portal Title and Description
d. Select Publishing -> Collaboration Portal

e. Enter Primary and secondary owners
f. Finally Click OK
g. You will receive this message when site is created

h. Click on the link to open the site.

Cheers.
1. Login to the computer with Domain Admin Account
2. Install Microsoft Windows Server 2003 Enterprise or Standard
3. Install Windows Server 2003 Service pack 1 or 2
4. Install IIS 6.0 with ASP.NET Enabled

5. Install Microsoft SQL Server 2000 with Service pack 4 or SQL Server 2005 with Service Pack 1 or 2.
6. Add Current Windows Users as SQL Server Administrator
a. Open SQL Server Management Studio
b. Connect to the server
c. Expand the server node
d. Expand the Security Node
e. Right Click on the Logins and Click Create New Login

f. Enter The Service account and Click Search

g. Enter the Service account again and click Check Names and click OK When confirmed.

h. Click on Server Roles from the left menu
i. Check Permissions for
i. DB Creator
ii. SysAdmin
iii. Security Admin
iv. Server Admin

7. Click OK
8. This User will be visible in the Logins window.

9. Now Confirm that the current logged in user is par to Administrator group on the server

10. Install .NET Framework 3.0
a. Go to E:\Library\Softwares\Microsoft\Dotnet Framework\DotNet Framework 3.0
b. Run dotnetfx3.exe to install the framework

11. Go to K:\MSP EPM\EPM Initiative\5 - Deployment\Upgrade Software\SharePoint Server 2007
12. Run Setup.exe
13. Enter pRoduct key from key.txt file
14. Click Continue
15. Check I Agree to license agreement and click Contineue

16. Click Advance to Choose the Advanced installation options

17. Click Complete to installed SharePoint Server 2007 as complete installation and click Install Now.

18. Wait while SharePoint setup install its binaries

19. Click Close and let the SharePoint Configuration Wizard Check box as Enabled.

20. Click Next on the SharePoint Products and Technology Configuration Wizard.

21. Click Yes on Services and IIS Reset dialog.

22. Click Create a New Server farm and click Next
23.

24. Enter Database Server Name
25. Enter the user with Administrative permissions on the SQL Server . The user name should be in the form of Domain\User Name

26. Check the specify port number checkbox and change the port number to some easy number. This will make you easily remember the Administrative site URL.
27. The default Security settings will be NTLM. If you want to go for Kerberos you can select the options. P.S. Kerberos authentication requires several complex steps for configuration. Should be done with appropriate knowledge of Networking Security.
28. Click Next

29. Click Next to confirm the changes you had made

30. Configuration Wizard will run the steps again

31. Click Finish when you see the screen.

32. SharePoint Central Administration Site will open automatically. You also need to add this site to Trusted Sites.
33. Enter Administrator user id and password in the login dialog window.
34. Click Add to Add this site to the trusted sites

35. Click Add and Close

36. You will see SharePoint Central Administration Web site

37. Enable Email Server on the environment
a. Click Operations -> Outgoing Email Settings

b. Enter Server name and Email Address and click OK

38. Enable Office SharePoint Server Search Service
Office SharePoint Server Search services is responsible for Crawling and indexing content stored Various MOSS Sites, File Shares, Network Shares, Lotus Notes Databases, SAP and People Soft (using Connectors). MOSS Search Service also provides Business Data Catalog that can extract data from any .NET Managed data source like SQL Server.
a. Click Operations -> Services on Server

b. Click on Start in front of Microsoft Office SharePoint Server Search
c. Under Query and Indexing section select both indexing and Query checkboxes
d. Enter Contact Email address
e. Enter Farm Search User Account which should be Domain user account. Do not use any build in account like network service etc.
f. Select path for the index file that will be created by the SharePoint Server 2007 Crawler.

g. Select from any of the Crawler performance options. This option will give appropriate memory and performance to SharePoint Server 2007 Crawler based on your system specifications.
h. If you have more than one search server you can choose different dedicated front end server but if you have single server installation you can leave the option as is.
i. Click Start when you are done.

39. Starting Microsoft Windows SharePoint Services Search Service
Windows SharePoint Services Search is responsible for Crawling and searching content that is stored in Windows SharePoint Services Sites.
a. Click Operations -> Services on Server
b. Click Start on the right side of Windows SharePoint Services Search

c. Enter Service Account for The Service (This account is required to run the service on the operating system
d. Enter Content Access Account is the account that has administrative access on all the sites on the server (This account is required to crawl content on the server)

e. Enter Database server and Database name for Windows SharePoint Services Search. WSS Stores index into SQL Server as compared to MOSS which stores content into an Index File (XML).
f. Select indexing schedule. A Good practice is to schedule after every 5 minutes to ensure efficient search. WSS search will not affect the performance of the server.
g. Click Start When you are done.
40. Starting Excel Services Service
a. Click Start on the right of Excel Services to start the service
41. Starting Document Conversion Launcher and Load Balancer Services
These two services provide the ability to SharePoint Server to Convert Microsoft Office Documents to WebPages if the client accesses these files does not have Microsoft Office Installed on the system. These services required additional settings which can be made by reading the Microsoft Office SharePoint Server deployment guide.
42. The services page will look like this

43. Creating a New Shared Service Provider for MOSS 2007 site
a. From left navigation click Shared Services Administration
b. New SSP

c. From the new SSP Page Enter SSP Title and then Click on Create a New Web Application for Administration Site host

d. Creating a New Web application for Shared Services Administration Site

i. Enter Port Number other than 80. E.g. (22 – which is easy to remember)
ii. Select NTLM for security

iii. Leave the reaming section unchanged
iv. In The application pool settings enter user name and password for the administrator (This user could be unique user other than current administrator)
v. Leave the rest of options unchanged

vi. Leave the rest of the options unchanged and click OK.
vii. After completion you will be back to NEW SSP Page.
viii. Click Start -> Run -> CMD
ix. Enter IISReset and press enter

x. Leave the section MySite Location as is.
xi. Enter the Administrator user id and password in the SSP Credential Section
xii. Change the Database names for both SSP DB and SSP Search DB to some relevant names.

xiii. Do not change the authentication method from Windows to SQL. Windows authentication is recommended.
xiv. Leave the remaining sections unchanged and click OK.

xv. Click OK on my site alert page.

xvi. When you receive confirmation that SSP Site is created.
xvii. Click Start -> Run -> CMD
xviii. Enter IIS Reset
xix. Click OK on the success page.

44. Creating Web Application for Portal Site
a. Click Application Management -> Create or Extend a New Web Application

b. Create a New Web application

c. Enter 80 as Port number
d. Leave Security and Load balance sections as is

e. In the Application pool section change the Application pool name (Optional)
f. Enter user id and password for administrator (this user could also be unique)
g. Leave the remaining sections as is and click OK

h. When you receive confirmation that web application is created
i. Click Start -> Run -> CMD
ii. Enter IISRESET and press enter


45. Creating a Site Collection or MOSS Portal
a. From Application Management -> Create a Site Collection
b. Select Default (80) web application from the web application drop down.
c. Enter Portal Title and Description
d. Select Publishing -> Collaboration Portal

e. Enter Primary and secondary owners
f. Finally Click OK
g. You will receive this message when site is created

h. Click on the link to open the site.

Cheers.